Not usually a fashion statement, but a much needed accessory – slippers are a must for winter weather.

Not usually a fashion statement, but a much needed accessory – slippers are a must for winter weather.
Mee-ow, it is I, Mimi, you’ve caught me slightly unprepared…

Have you heard of dye-lots?
If you’ve been crocheting or knitting a while you will have, but if you’re a beginner… you need to know! Every yarn has a color of course, but it also has a dye – lot. The dye-lot is all the wool that was dyed at the same time. This means they will all be exactly the same color. You can find the dye-lot by reading the label next to the color.

So when you go to start a new project, don’t just scoop up an armful of the same color – check the dye-lot to make sure they came from the same batch or you could wind up with a two-tone finished item that doesn’t look so good.
Any questions? Yes??

What if you can’t get the same dye lot??
Firstly, don’t give up until you’ve talked to the store person, they may have another shop they can ring and get it from.
And if not?
It’s time to get creative. Treat the different dye lots like different colors. Work out a pattern you can use them in. Try stripes or alternate motifs or what ever your project and imagination suggest.
Or take the yarn back and get a different one.
Here’s a project Emma used many different navy yarns on.

On the close up you can see how I used the different yarns in patterns.

Have a happy day and don’t work too hard,
Mimi
This is the Wheels Within WheelsWrap.

It is crocheted in a large Bruges Lace.

It will be my final wrap for a while.

The pattern is available for sale at Ravelry.com
This is the more advanced version of Easy Windows Wrap.

The difference is the changing color!

And I have hardly taken mine off since I finished it!
The pattern is available for sale at Ravelry.com
Mee-ow to you all, it is I, Mimi, once again. 
Today I’m going to show you another tricky use for slip stitch.
There are several techniques for changing colors mid-row, and this is one of them. The trick is, when you crochet this way, you don’t actually change the color mid-row, it only looks that way. What you are really doing is attaching a second row to the first with extra chain and slip stitches.
Here’s an example of how it can look when it is finished.

So how do you do it?
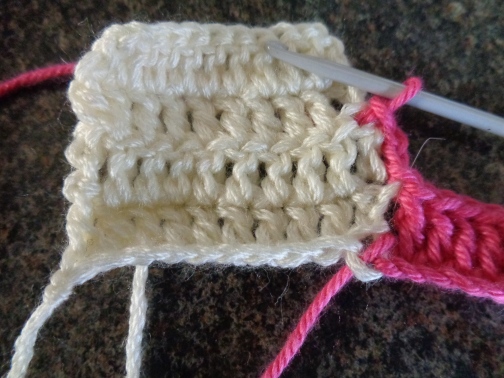
You start with a block of rows in the first color like this:

Then you slip stitch into the last chain stitch of the block with the new color and add however many more chain stitches you require, like this:


Next you add a row of stitches (the same size stitches as your original block) working your way back to your original chain in the new color.

The next thing to do is secure the top of that stitch with a slip stitch into the side of the same height stitch in the previous color to combine the 2 colors into one row securely.

You then do your turning chain with one stitch less and replace the top stitch with another slip stitch into the other colored stitch beside it in the new row.
From there you turn and continue the row.
You can repeat this for however many rows you need to create the desired effect of a 2 color row.

Mee-ow, it is I, Mimi.

Today I’m going to teach you a wonderful thing you can do with a tiny little stitch called slip stitch, sl st for short.
Sometimes when we crochet we want to start the next line in a different place to where we finished it.
If we want to make it longer we can simply add more chain at the end of the previous row like this (no slip stitches required)


If you want to finish in a longer place and start again further in you can finish off and start again, but that is too messy when there is a much more suitable solution that looks is easier and looks better like this.
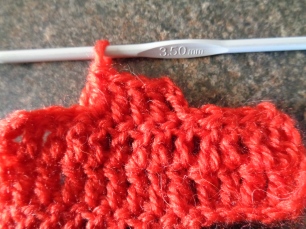
So how do you do it? You start a new row adding a sl st to the top of each stitch you don’t want to increase, like this.

I did this example in a separate color so you can see what I’m doing, but usually it would look like this – a seamless edge.

Once you reach the start of the next row you do your turning ch and continue on happily with your project.
Inspired by the success of the Blanket Wrap we have now completed the Easy Window Wrap.

This pattern is an easy one – hence its name – and is perfect for those cooler summer nights…

…or winter subtropical days, depending on where you live! The pattern is on sale at Ravelry.com if you’d like it.
Meet Tiger Lily!

She is sporting a beautiful crocheted dog coat of course!

She has recently joined us as an apprentice.
 Tiger Lily is a country girl who knew young that chasing wild pigs was not for her. She escaped to the outskirts of the city where the RSPCA gladly took her in.
Her gentle nature and eagerness to please make her a real asset and pleasure to have around. She has been exceptionally quick to learn everything we have taught her so far.
She is very interested in learning to crochet and design. She dreams of becoming an Art Therapist for other young female dogs at risk.
Winter is finally upon us in the southern hemisphere, and what easier way to warm up with a handmade wrap?

It’s a beginner way to make a warm garment.


If you’d like to give it a try it’s on sale at ravelry.com
Hi Everyone,
It’s Typsy here! Prrrrr to you all.

I thought I’d help Mimi out by doing the next post. Today I’m going to explain about tension squares and show you how to make them.
Many people are so excited about starting their new project that they skip or forget to do a tension square first. Oh O. The end result is that their new item is bigger or smaller than the pattern said it would be. You can get away with this when making cushions or rugs – but if you are making an item of clothing you want it to be the RIGHT size, right?
So this is what you do
1. Check the pattern for the gauge details
The gauge has 2 parts. First is the pattern of what stitches to do. And the second is the measurements for how big the stitches should be.
For our example we are going to do the following:
Pattern – alternating rows of hdcs (half double crochets – American system) with trs (triple crochets – American system).
This is how this pattern looks

And the pattern specifies
10cm/ 4 inches wide = 14 stitches, 10cm/ 4 inches high = 8.5 rows
Also important is the hook size and recommended yarn, which in this pattern is hook sized 3.5mm and 4ply cotton
2. Crochet a square
It is fairly standard that a gauge will tell you what length and width to make the square, but it is better to make the square bigger than this because edges and the first row can be misleading if your tension isn’t 100% stable… mine never is…
So for a 10cm/ 4 inch make a square that is 15- 20 cm/ 5-6 inches in size. The width is more important than the height because it can’t be easily fixed once the garment is underway. For this reason I do a square that is 20 cm wide and 15 cm tall.
In this example I am also using a different type of yarn than the recommended cotton – still the same size (equivalent to 4ply) but a different texture.
And here is my first square.

3. Assess the square
Now we lay the square flat, take a tape measure and measure the width counting all the stitches within 10 cm.

As you can see there are 15 stitches in 10 cm, but the gauge specified only 14 stitches. This means that if I follow the pattern exactly my garment will be too small…so what do you do? The easiest thing is to change hook size. Because it is too small I will try again with a LARGER hook (4mm – the next size up)
If it had been less stitches than the gauge, that would have meant it was too big and we would try again with a SMALLER hook.
4. Crochet a second square if necessary
So this is the second square measured.

We now have it right! If we didn’t, we would make another square changing the hook size again until it was.
5. What about the height?
Ideally if you get the width right the height should fall into place too. So let’s look at the height of the second square and see how we are going…

Hmmmm… there are 7 rows instead of 8.5 rows. That means the pattern will be too long if you follow it exactly. But as making it smaller makes it too thin, what do you do?
If your stitches are the right width but your rows are either smaller or longer than they should be, go with the correct width. Why? Because you can always add more or less rows to make the item longer or shorter, but you can’t add extra foundation chain later to make it wider.
Most clothing patterns work in measurements rather than row numbers to get around this very problem.
I hope this has been helpful.
Meow for now,
Typsy
